AI Image Upscaler for Sharper, Higher-Resolution Photos
Have a photo that looks blurry, pixelated, or too small to share? PanoCut's AI Image Upscaler helps increase image resolution and improve apparent detail, making photos look clearer and more polished. Choose from 2×, 4×, 8×, or 16× upscaling to prepare images for Instagram posts, carousels, and other social media content.
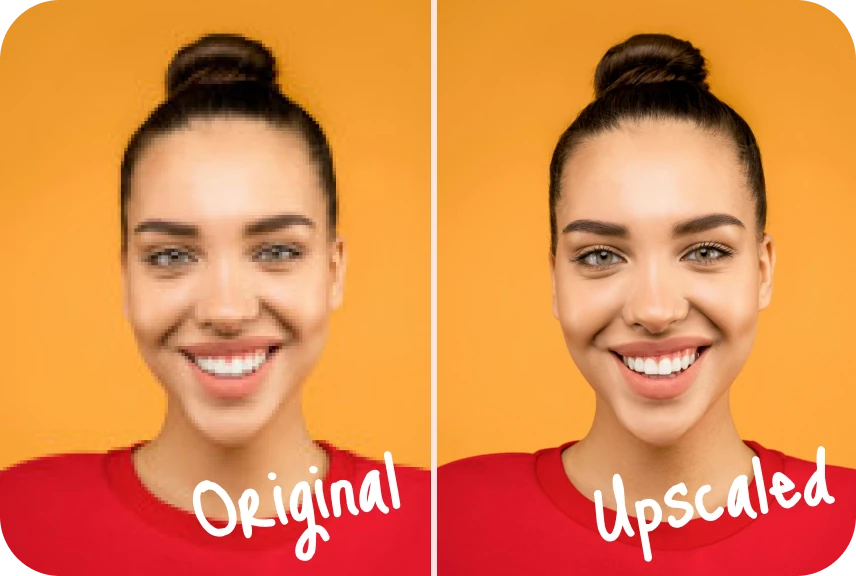
What Is an AI Image Upscaler?
An AI image upscaler increases an image's resolution using artificial intelligence to reconstruct and enhance apparent visual details. It can be useful when a photo looks soft, pixelated, or too small for its intended purpose.
Unlike simply enlarging an image, AI upscaling attempts to improve the appearance of details as the image becomes larger. The result depends on the quality, sharpness, and content of the original photo. AI enhancement cannot guarantee that every missing detail will be recovered accurately.
Choose Your Upscaling Level
PanoCut offers four upscaling options, allowing you to choose how much to enlarge your image. The best option depends on your original photo and the resolution you need.
- 2× upscaling: Double the image dimensions for a moderate increase in resolution.
- 4× upscaling: Increase the image dimensions fourfold when you need a larger result.
- 8× upscaling: Create a substantially larger image for use cases that require additional resolution.
- 16× upscaling: Choose the highest enlargement option when you need a much larger image and the original photo is suitable for this level of enhancement.
These multipliers refer to image dimensions. For example, 2× enlargement doubles both the width and height, resulting in four times as many pixels. A 4× enlargement produces sixteen times as many pixels.
Higher enlargement does not automatically mean a better-looking photo. If your original image is blurry, heavily compressed, or very low in quality, a lower upscaling level may produce a more natural-looking result.
What Can PanoCut AI Upscale Do?
- Increase image resolution: Enlarge photos using the available 2×, 4×, 8×, and 16× options.
- Improve apparent sharpness: Enhance the appearance of edges, textures, and other visual details.
- Reduce visible pixelation: Improve the appearance of images that look rough or blocky at their current size.
- Prepare images for social media: Create higher-resolution versions of suitable photos for Instagram posts, carousels, and other content.
When Should You Upscale a Photo?
Image upscaling can be useful in several situations, depending on the quality of your original photo and how you intend to use it.
- Low-resolution photos: Enlarge small images when you need a higher-resolution version for sharing or editing.
- Older photos: Improve the apparent detail of suitable images before sharing them online.
- Cropped images: Enlarge an image after cropping when the remaining photo needs more pixels.
- Instagram content: Prepare images for posts and carousels when you want them to appear clearer.
- Images for further editing: Create a higher-resolution version before making additional edits or preparing the final image.
How to Upscale an Image with PanoCut
- Open your photo. Select the image you want to enhance in PanoCut.
- Choose the Upscale tool. Open the AI image upscaling feature in the editor.
- Select an upscaling level. Choose 2×, 4×, 8×, or 16× according to the original image quality and your intended result.
- Apply the enhancement. Run the upscaling operation using the available settings.
- Review the result. Check faces, textures, edges, and other important details. Compare the enhanced version with the original photo if a comparison is available.
- Save your image. Save the enhanced photo when you are satisfied with the result.
Tips for Better AI Upscaling Results
- Start with the best original image available. A clearer source generally gives the AI more useful information to work with.
- Choose the enlargement level carefully. Use the lowest level that meets your needs rather than automatically choosing 16×.
- Inspect important details. Look closely at faces, text, fine edges, and textures after enhancement.
- Keep expectations realistic. AI may reconstruct plausible-looking details, but those details are not guaranteed to match the original scene exactly.
- Consider your intended use. The resolution you need depends on where and how you plan to display or share the image.
Frequently Asked Questions
What does an AI image upscaler do?
An AI image upscaler enlarges an image while attempting to improve its apparent detail and sharpness. It can create a higher-resolution version of a photo, but results depend on the original image.
Does PanoCut support 2×, 4×, 8×, and 16× upscaling?
Yes. PanoCut offers 2×, 4×, 8×, and 16× image upscaling options. The most suitable option depends on the quality of your original photo and the result you want.
Will upscaling make every blurry photo clear?
No. AI upscaling can improve the apparent sharpness and detail of some images, but it cannot guarantee recovery of information that is missing from the original photo. Very blurry or heavily compressed images may still have visible limitations.
Which upscaling level should I choose?
Start with 2× or 4× if you need a moderate increase in resolution. Consider 8× or 16× when you need a much larger image, but review the result carefully because higher enlargement does not always produce better visual quality.
Explore More PanoCut Photo Tools
Image upscaling is one way to prepare photos for social media. PanoCut also offers tools for transforming and preparing images for different creative needs.
Explore all PanoCut AI image tools